
Wednesday, April 21, 2010
Wednesday, December 9, 2009
How To Brighten Your Teeth Without Whitening- Wild Magnolia Artistry

I am sure that most of us would love to make our teeth look white and bright. I am going to tell you a few tips on how to do that without having to do any teeth whitening.

First, choose the right lipstick shade. Go for a bright red--it'll make your teeth look whiter in contrast--and avoid magenta hues with pinky-blue undertones. They can make pearly whites look a little yellowish.

Second, wet your teeth before smiling. You can do this by either licking them or taking a drink of water. This will give your teeth more sparkle.

Third, apply a little dab of lip gloss to the centerpart of your lower lip to make lips look plump and teeth look shiny!
Now you know 3 easy ways to brighten up your smile. Hopefully the results will put a smile on your face!
For more makeup tips please visit our website.
Thanks for reading!
Chelsea Price
Wild Magnolia Artistry
Thursday, December 3, 2009
Yoga For Kids

A few weeks ago I was asked to teach yoga to a class of 4 year olds. Now, not only do I not have kids- but I am barely even around kids, so I thought how in the world am I going to do this? And how did I even get myself into this?
I teach a class once a week at Patrick Henry Elementary for a group of teachers after school. The teachers seem to really love the class- and so one of the teachers asked me one day if I would like to come in and teach her class a short yoga routine. I immediately agreed- even though I had no idea how I was going to alter my class to a much younger audience than I was used to.
After working with some great yoga flash cards called "Yoga Pretzels" I got my class in order, not sure if the children would respond to me at all.
The morning of the class I showed up with much anticipation, but confident that at least someone might want to do a pose called "Downward Facing Dog" - or maybe even a pose called "Cobra."


The kids immediately got into a circle and took off their socks and shoes. And, being as quiet as they could for a group of four year olds, they began following me through the motions. We practiced being mountains, cats, dogs, boats, and even rocks. A few times I asked the kids to let me hear what sound they thought that particular animal made. The kids were really good at this- and a few even came charging towards me on their hands and feet barking! Not to mention, I almost got "attacked" by a "shark."

At the end of the routine we all laid down and closed our eyes, imagining that we were in our "special place." We imaged what it looked like around us, maybe we were somewhere we had seen in a picture, or maybe just our room at home. We imaged who was there with us, and took time just to be quiet. Everyone did so great at this!

This was such a great experience and I cannot wait to go back and teach another class!
For more information please visit the Life Yoga website or become a fan on Facebook!
Thanks for reading!
Hillary Wright
Life Yoga, Owner
Different Tools for Different Hair Styles

The grass is always greener on the other side, right? Not always, especially when it comes to your hair and it's health. Sometimes when you are constantly putting heat and pressure on your hair to get it to 'perform' the strands get a little 'burnt out'. Working with what you naturally have is always easier.
But - if you are willing to put the time and energy into your hair, you might as well do it the correct and easiest way!
First - Blowdry the hair. But WAIT!!! Do you step outside when it's blazing hot and then sun is beating down on you without sunscreen? No, not if you listened to your mother and father and grandmother and everyone else. So don't 'sunburn' your hair either with your blowdryer. Put something on the strand to protect it from the heat.
Second - Use your blowdryer to remove 60-75% of the water.
Third - Section, section, section!!!! Invest in some hair clips, they make your life MUCH MUCH easier. I usually part in front of the ear on both sides and section that. I then pull the crown into one larger section. Then 2 more sections of the remainder of the hair in the back.
Fourth - Put the concentrator onto the end of your blowdryer (it should have come with this). Start with the bottom section in the back and just use a vent brush to detangle and get some of the wetness out. Then use a round brush to pull it straight and smooth the ends down. When this section is dry, work your way up the head. When you finally get to the crown, separate that into smaller sections and try to pull the brush straight up, to achieve more volume (If you have questions, just ask when I'm styling your hair and I'll elaborate more.)
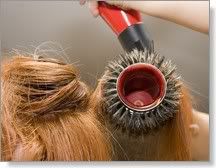
Fifth - Move to the sides, start blowdrying the bottom section, and then work your way up.
If you need volume - use a round brush and extend it into the air. If you want flat hair, blowdry with a paddle brush and lay it smooth against the scalp.
Also, make sure you're only washing your hair once every other day or every two days. Dirty hair usually styles better than clean; the flyaways are smoothed down, plus it helps to not dry the ends out.
If you feel the need to flat iron your hair, try to only smooth down certain parts the first day to preserve your hair and its health. Make sure that you spray a thermal protectant before using any type of curling or flat iron on your hair to protect it as well.
If you have any other questions, feel free to e-mail me at christa.michelle.stylist@gmail.com.
Thanks for reading!
Christa Tyler
Wednesday, December 2, 2009
Song Selection: It Will Make or Break You

Picking the right song plays a huge role in how a wedding film turns out. Often times people immediately assume they need a traditional love song, but this is something we try to stay away from. We want our clients to select their own music, but we are always more than happy to offer suggestions.
We look for songs that express emotion through the feel of the music and not just the lyrics. For our more cinematic edits, we often pick movie soundtracks that have no words at all.
Remember too that we can edit songs, so if you love the sound of a particular song but, say, don't like the words in one verse, we can lower the vocals or cut out that verse alltogether. Here is a good example. We love the sound of this Jason Mraz song, but didn't feel the whole thing fit a wedding film. So, we used just the intro and chorus in a Wedding Trailer and it worked perfectly.
It hasn't always been easy to share our thoughts with brides because most sites that sell MP3s only allow you to hear a short clip of a song. But now there's a great resource that offers previews of full-length songs. It's www.lala.com.
Here are a couple of songs we're using in wedding films we're editing right now.
One final tip is to consider the use of covers. Often times there is a classic song that fits the video and the couple perfectly, but it just feels outdated. We thought Centerfield would be perfect for our most recent Trash The Dress, but we wanted something a little more lively. We found a cover of the song, and it was perfect.
Shelby & Greg | Trash The Dress from Sarah Pendergraft on Vimeo.
Learn more about us at PenWeddings.com and PenWeddings.blogspot.com.
Eyelash Curlers
I think that eyelash curlers are something that women either love and use on a daily basis or they never use one. I am guilty of belonging to the second group. However, I recently went and bought one at Target and I was really impressed. I bought the ELF version which was $1 which is probably about as cheap as you will find one.

Should you even bother using one? I would say yes. Curling your eyelashes helps to open up your eyes and makes your lashes look longer and fuller. Anyone who follows my blog or has ever had their makeup done by me knows that I love lashes and this is the next best thing to applying false ones. Having said that I am going to give you some guidelines to using the eyelash curler in the most effective way.

First off, never use an eyelash curler with your mascara already on. It should only be used prior to mascara application. Mascara can cause your eyelashes to stick to the curler which could result in your lashes being pulled out.
Second, many people will tell you to warm up the curler before use. This is fine but make sure not too get it too warm which could cause you to burn your eyelids. This could also cause your eyelash curler to leave a crease in your eyelashes. If you are going to warm up your curler make sure to check the temperature before you use it.
Finally, do not use waterproof mascara if you are using an eyelash curler. Now when I say do not use it, I don't mean just when you use the curler. I mean don't use it at all! Waterproof mascara is very drying to eyelashes (I personally believe it should only be used on very rare occasions). When you mix dried out lashes and a rubber strip being pressed against them, you have a very dangerous combination. I was attending a makeup class one time and the instructor told us about a girl that he was using an eyelash curler on and everyone of her eyelashes fell out due to dry brittle lashes from using waterproof mascara. I do not think that any of us want to have to go without our eyelashes, so stay away from the waterproof mascara.

Eyelash curlers can be purchased at any drugstore or makeup counter. They range in price from $1 to $20. One particular curler that has a very big following is by Shu Uemura. You can find it at Sephora for around $18. Many women swear that this is the best one that you can buy. I am planning on buying one pretty soon so I will let you guys know what I think.
Friday, November 20, 2009
Life Yoga- How To Make the Best of What You've Got
OK, so you are all on board with the healthy, organic food train- your grocery list is made, your recipes are picked out, and then you realize you have a problem: you don't have a store that provides everything that you need (as in a Whole Foods or natural food store). What do you do at this point? This is a question that I get all of the time- especially from my mom who is limited to a few choice stores and is a dedicated gym member and healthy eater! I have been coaching her through this for a few months- so I thought I would share what I have been helping her with. And this may save you a few dollars in the meantime too!
Here are my top 10 tips for making the best of what you have:
1. Buy as many unprocessed foods as you can! Processed foods are more expensive than whole foods and if you stick to the main food categories (fruits, vegetables, dairy, and grains) you will save a lot of money and your grocery list will immediately start to eliminate all of the unhealthy items on its own.
2. Shop seasonally! Fruits and vegetables that are in season will be cheaper, fresher, and also better for your body. Plus if you eat in-season you will always be switching it up and never get stuck in a food rut! Here is a website that will help you with what is in season.http://frugalliving.about.com/od/foodsavings/tp/Cheapest_Produce.htm
3. Pick the most important fruits and vegetables to buy organic! Fruits and vegetables where you eat the skin are the most important thing you can buy organic. So if you have to make the choice choose these.According to The Environmental Working Group, this includes: peaches, apples, sweet bell peppers, celery, nectarines, strawberries, cherries, lettuce, imported grapes, pears, spinach, and potatoes.
4. Shake the hand that feeds you. AKA: Buy from a farmers market! This is not only the cheapest way to buy your groceries, but the most reliable way to know exactly what you are buying and eating. You will be closer to the producer of your food than ever before- which is a wonderful and empowering feeling. Most farmers market's end in the month of September but when they are accessible this is a MUST!
5. Join your local co-op. Many co-op's have programs where you sign up and each week you receive a different box of fruit and vegetables. You will receive what is in season and it will also force you to try different vegetables that you would have never bought before (once again helping you out of your food rut)! Many co-ops also offer locally produced meat! (Which means no hormones or additives AND no mistreatment of animals!)

which brings me to my next point...
6. Buy meat from a local meat market. Now- most people know that I do not eat meat- but I also realize that people do eat meat and there is a relatively humane way to eat meat- and it is from a local farmer. So find your local meat market to buy any of your meat products from now on. And cut out ALL meat from fast food chains. And from anywhere that the meat is provided by a factory farm. Period.
7. Buy frozen fruits and vegetables- not canned! If all of my other rules have failed you and you HAVE to have some blueberries (or whatever you crave) out of season (which is completely fine- I crave avocados and bananas all year round) you must buy frozen! There are so many less preservatives in frozen foods than canned- and a lot of times you can find them for the same price or even cheaper!
8. Tofu! I know that a lot of people are afraid of tofu- but don't be! It is SO delicious and SO good for your health. Tofu has more protein ounce for ounce than beef. I know that they sell tofu in every grocery store- and I have a ton of yummy tofu recipes that I will be posting soon.
9. Find a local farmer to buy eggs from. In every town there are farmers who's families depend on their crops- including their eggs. Support your local economy and find a farmer who is selling eggs from their own chickens. These chickens have been fed grain (not corn), gotten to live outside and take little dirt baths and live the life every chicken would dream of! They will taste fresher and be MUCH better for your health- and they are accessible wherever you are!

10. Grow your own! The best way to find out if something is fresh or in season is to grow it yourself! Starting a garden can be fun, educational, and delicious! This is a great activity for kids, and a way to get the whole family involved in the food that they eat. This way you have all of the vegetables that you want in your own backyard!
Hope these few tips help you to make the most out of every situation so that everyone can access the healthy, delicious foods that we all crave!
For more information about healthy lifestyles please visit our website or blog- OR become a fan on Facebook.
Hillary Wright
Life Yoga
580.304.6241
Subscribe to:
Posts (Atom)